*NEW*- We now have Dealers who can do expert installs.
Find your Dealer here!

|
|
Trueleo Lotus Elise/Exige products
*NEW*- We now have Dealers who can do expert installs. Find your Dealer here! |
| LETSLA Install Instructions -Updated
9-20-2011 Lotus Elise/Exige
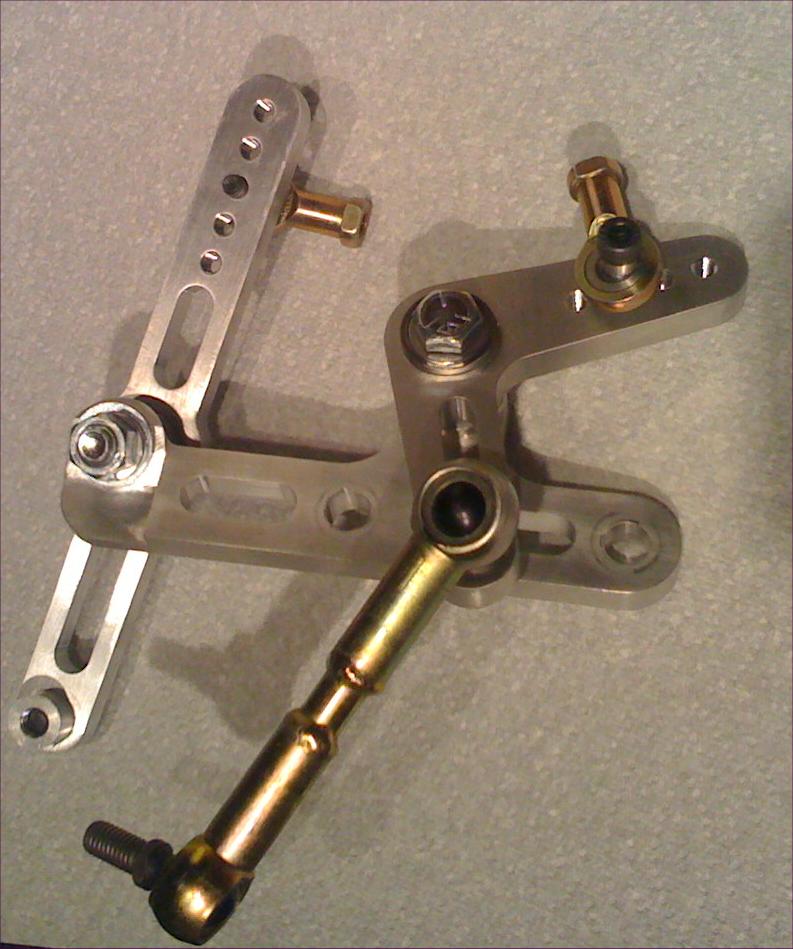
Transmission Shifter Linkage Assembly. LETSLA
Tools required- 10mm wrench, 12mm wrench, 12mm sockets, 14mm socket, 8mm allen socket, socket extension, socket ratchet handle, phillips head screw driver, metric allen set, needle nose pliers. NOTE 1- It is not required to take the
bottom alum pan off under the engine, but if you are like me when
with working with small bolts and nuts on the mid engine Elise you
may drop something and it makes it easier if it off. You may
also find it easier to work the cables at the transmission side if
you take off the black cable tie holding the cables on the bracket
at the transmission when the cables start to turn up. I have done it
both ways and it was easier when off.
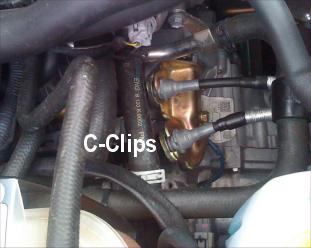
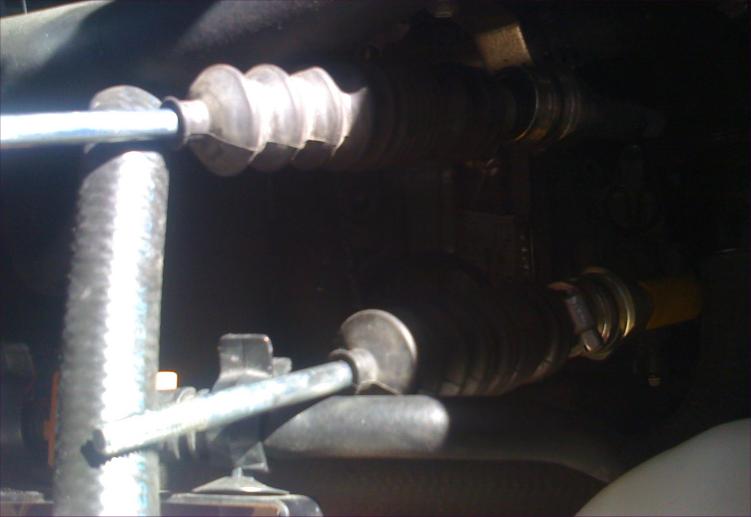
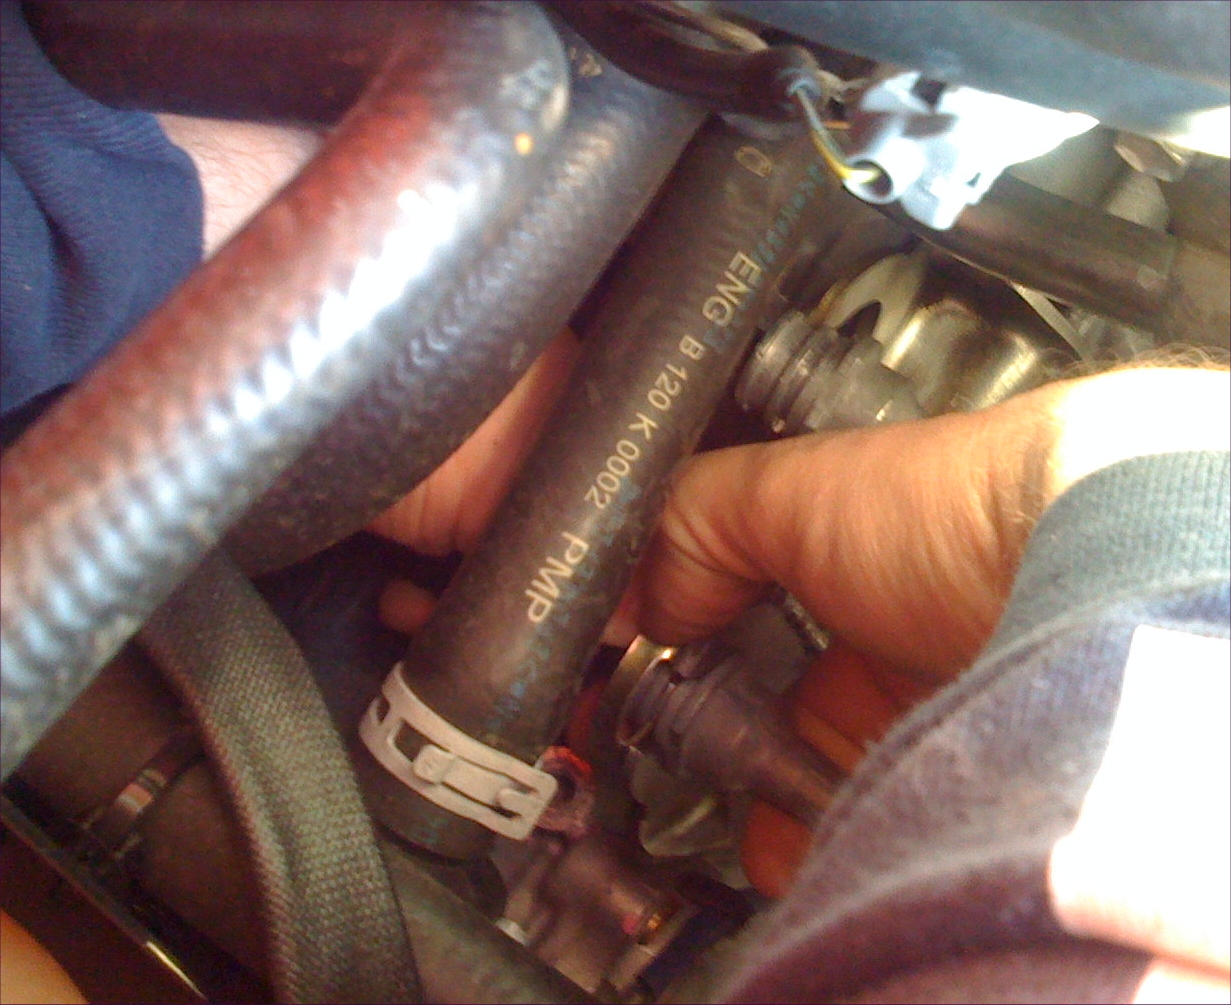
Removing the old stock assembly and preparing the cables for the LETSLA installation 1) Remove C Clips · Open the engine lid compartment and use needle nose pliers to take the two C-clips off the shifter cables that hold them to the gold bracket. (The needle nose pliers will fit in the space and the clips will just pull up). Important: Label the Shift cable and Crossgate cable clearly. You must not reinstall in a reversed pattern. Pull the cables away from the bracket. 2) Remove the two 14mm bolts from the cable bracket · Use a 14mm short stock and ratchet or a 14mm open end wrench and remove the two bolts holding on the cable bracket. (By taking this off first it will make the next procedure easier, plus it needs to come off later anyway). · Save these bolts as you will use these to install the LETSLA cable bracket later. · Remove stock gold bracket. 3) Remove two cable "R" clips from the stock cable ends · You can just reach down with needle nose pliers and pull off the clips and pull up the cable ends that are on the stock linkage so the cables are free. · Pull the cables out of the way (back and to the center of car). 4) Remove stock cable ends from cables · Remove the stock cable ends using a 10mm wrench to crack the locking nut holding it tight. · Remove these so the only the M6x1.0 thread is showing for the later install of the rod ends. · Pull the cables up towards you to help later when you install the LETSLA .
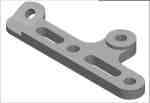
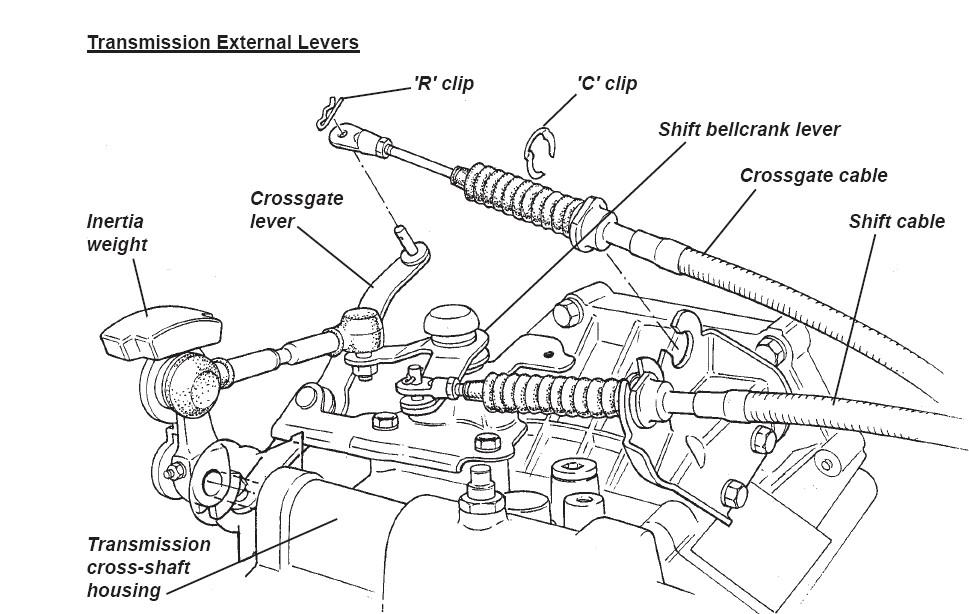
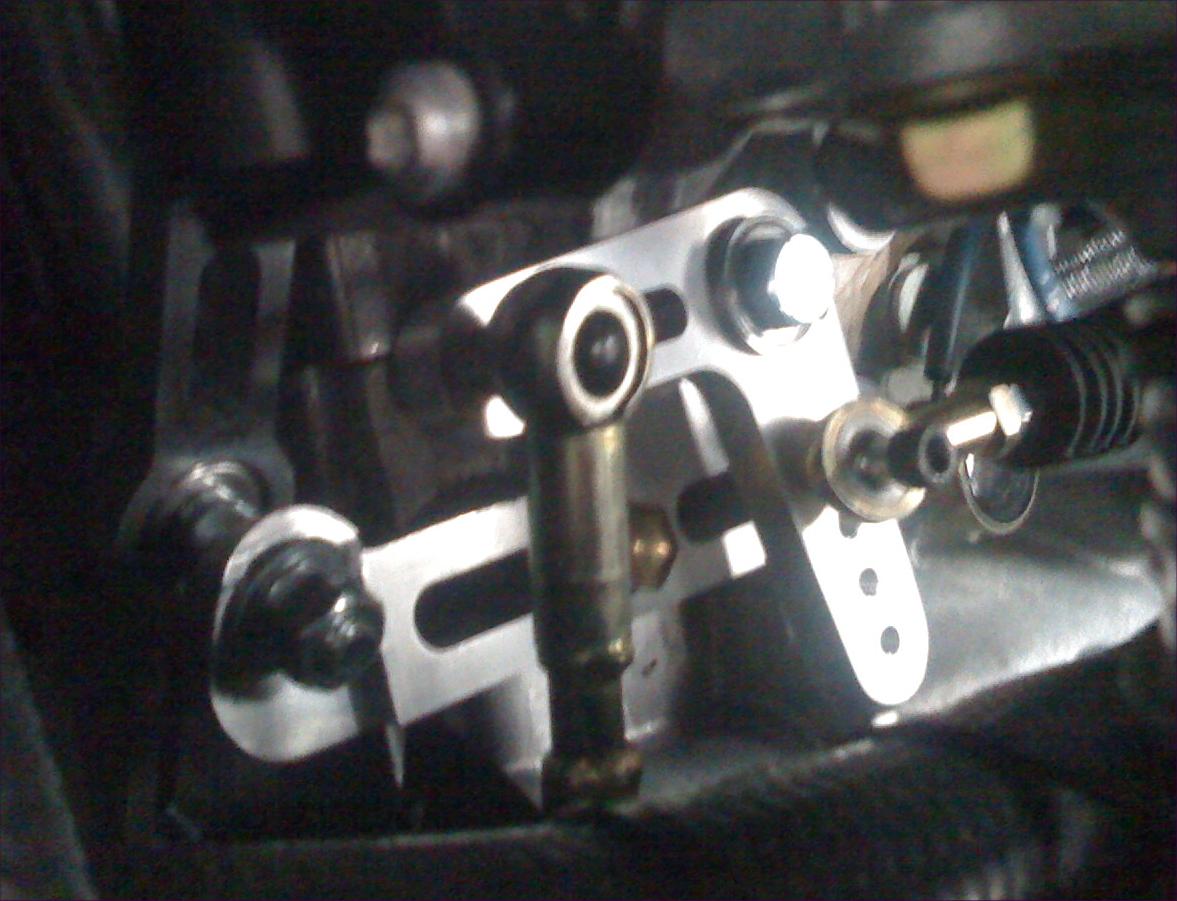
5) Remove the two 14mm bolts holding the stock linkage- · Use a 14mm socket and long extension to remove the two bolts holding the stock linkage assembly to the transmission. · You can do this from above and you will need to wiggle the socket down on to the bolts around the water hoses. · Remove those bolts and save for later as you will use the same ones to install the LETSLA. The linkage assembly will be slightly looser and move around somewhat. 6) Remove plastic rectangular cover from crossgate lever · Locate the small rectangular plastic cover on the end of the crossgate level. · Remove rectangular plastic cover to avoid it falling down to the under tray. · Retain plastic cover and place on the new LETSLA assembly. Now the stock linkage assembly is only connected to the car by the double rod end that is connected to the shift bellcrank lever to the crossgate inertia weight (see diagram above for details). 7) Remove 12mm nut and locking washer connecting bellcrank lever to rod end linkage · Use a small 12mm wrench and remove the nut and washer that is on the shift bellcrank lever. · Retain nut and washer for use during LETSLA installation procedure E).
8) Install the cable sheath protectors. a) Crossgate cable (use 4” metal sheath protector) · Remove the locking washer from the rod end · Pull off the rubber boot. · Slide on the 4" sheath protector on the crossgate sheath and clamp down. · Replace the rubber boot and make sure you slide it all the way on so it does not get in the way of the rod end and stop the cable from going all the way in. · Replace the locking washer. b) Shift cable (use 3" sheath protector) · Repeat procedure as above using 3” metal sheath protector
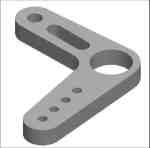
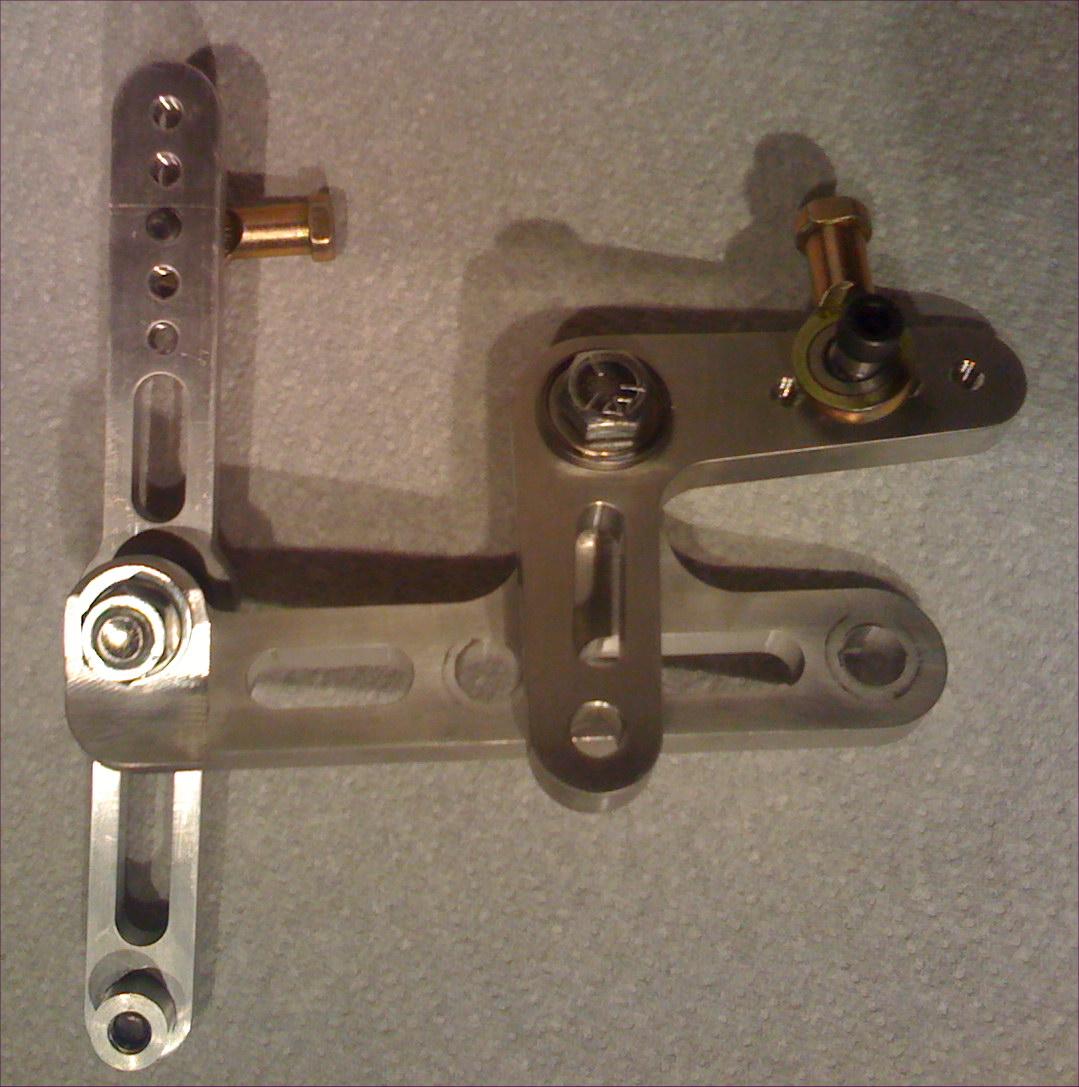
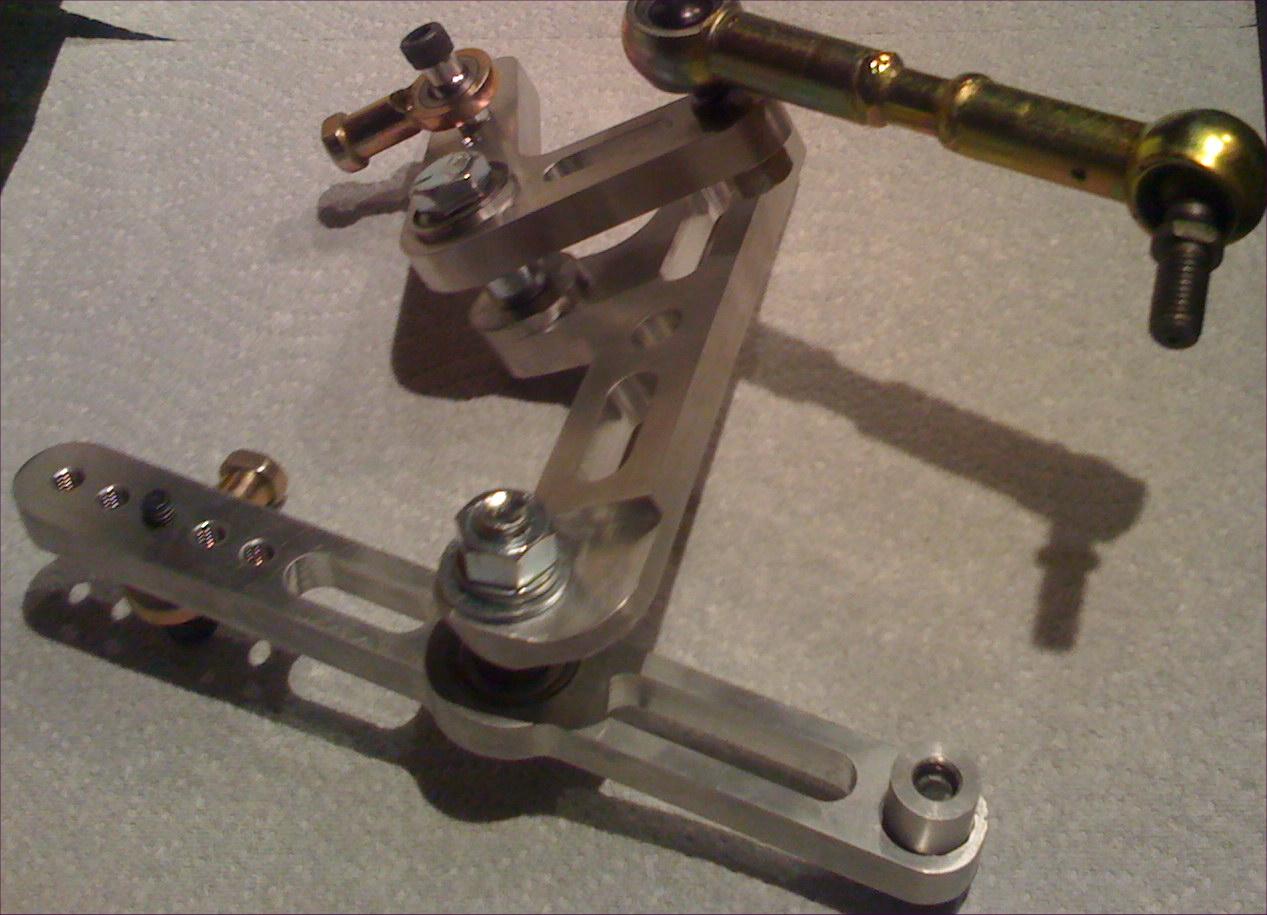
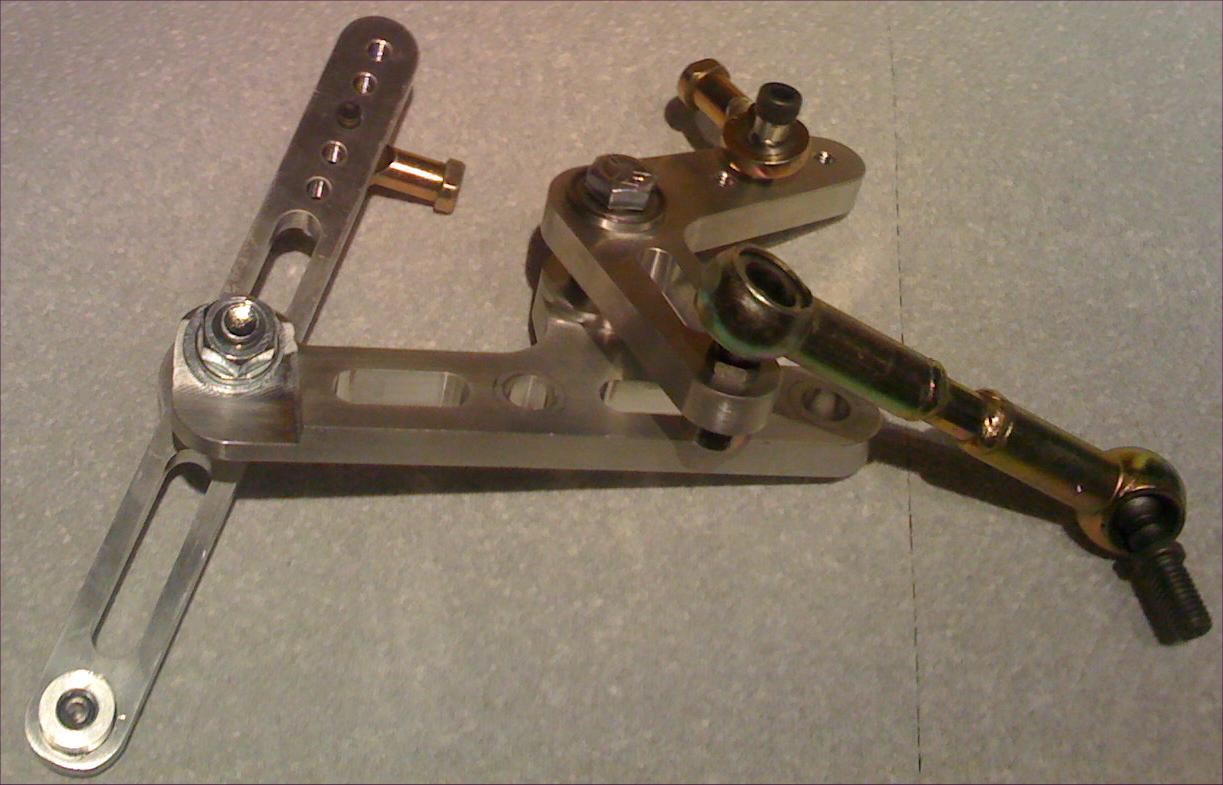
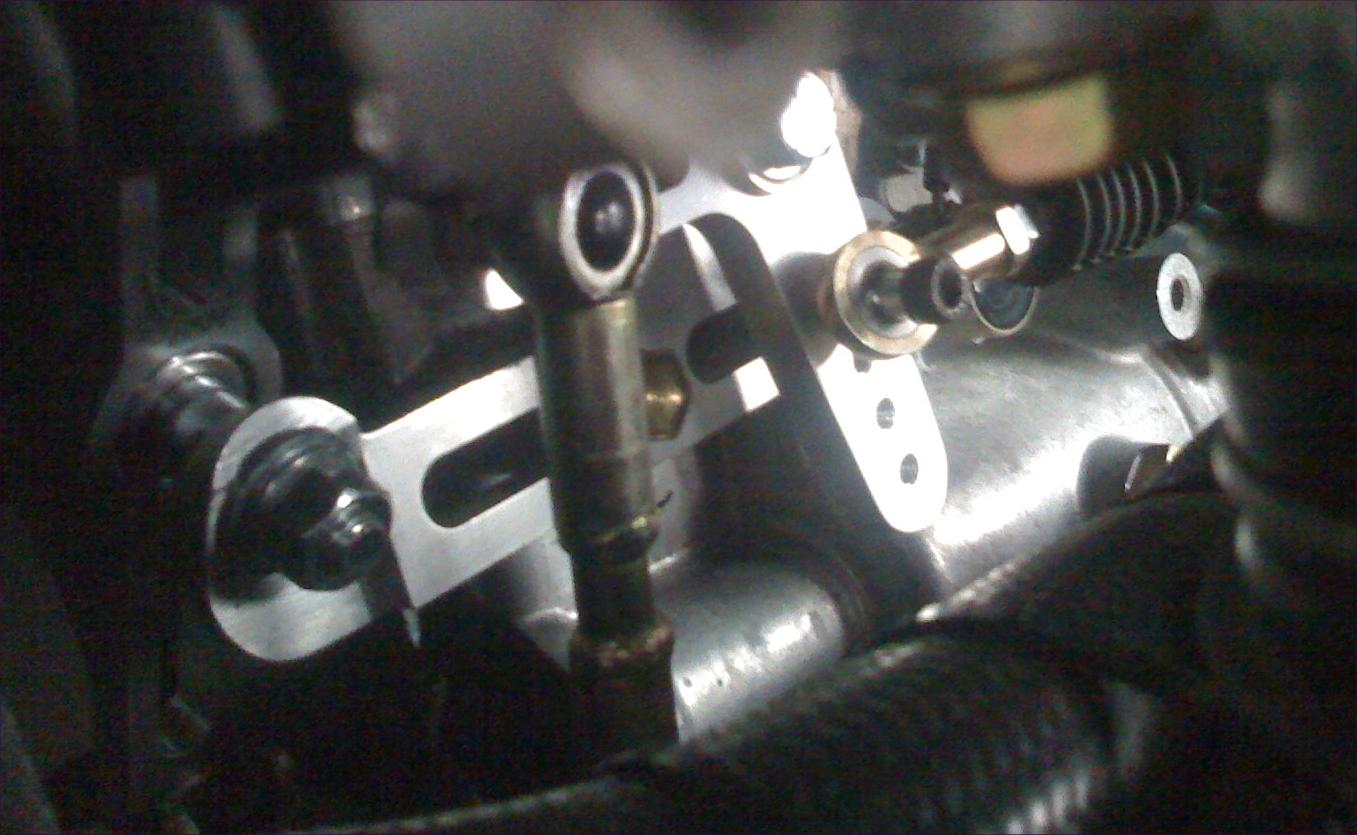
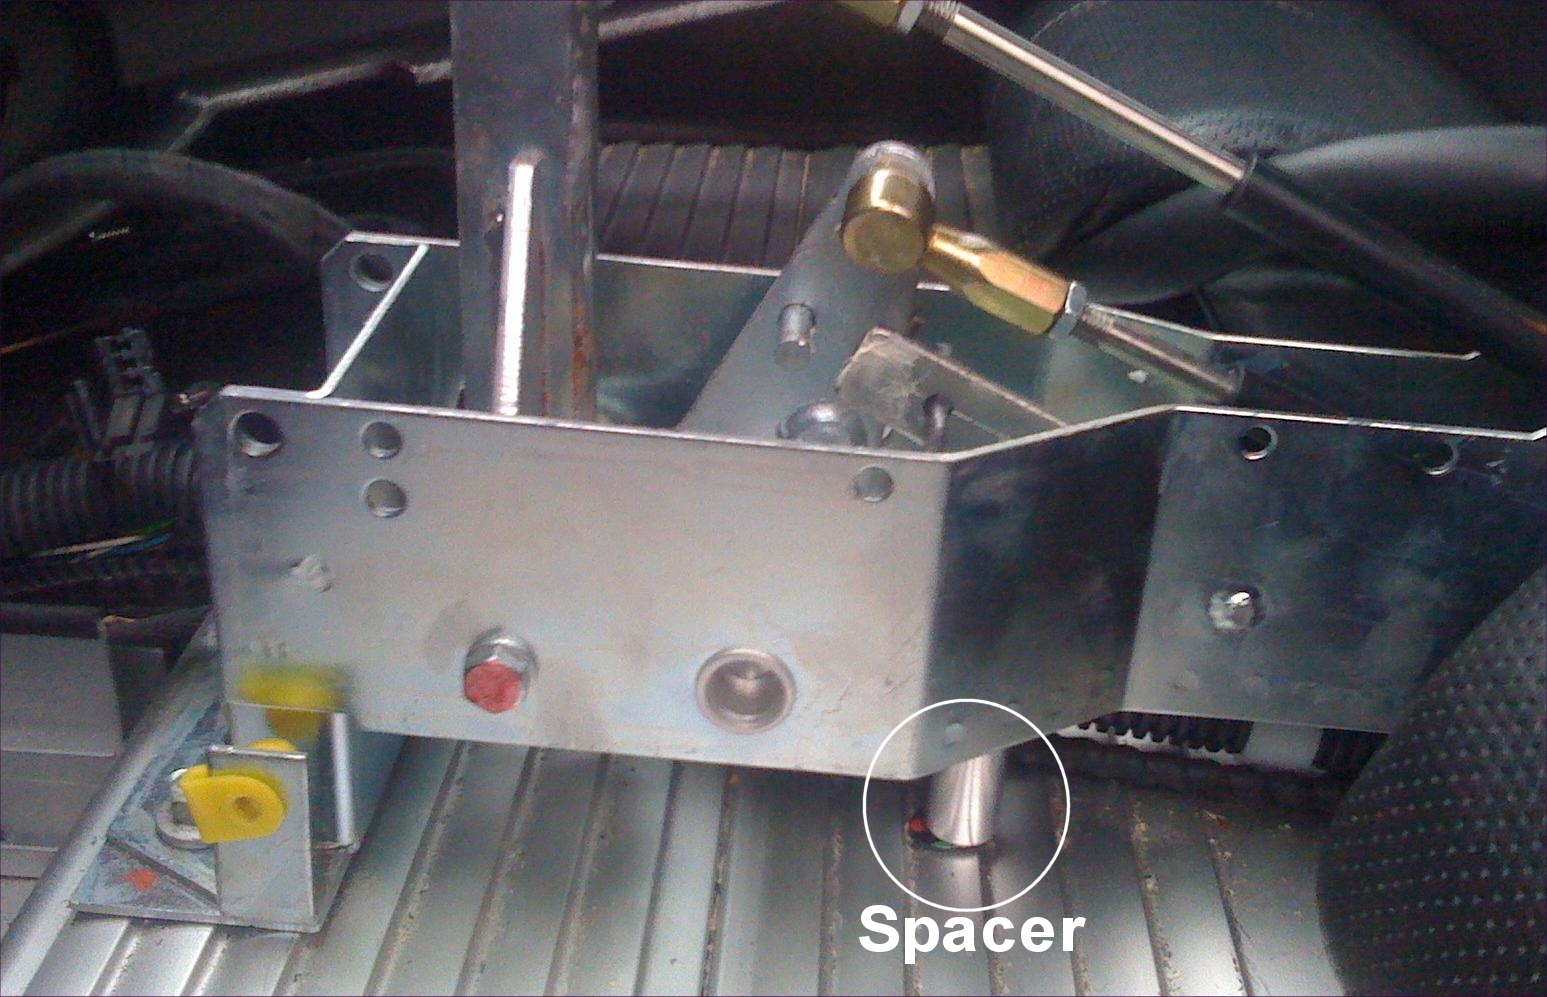
LETSLA Installation procedure A. Disassemble the LETSLA · To make installation easier it is recommended that you breakdown the LETSLA into the following two pieces. 1. L shaped bellcrank lever. 2. Base assembly bracket with crossgate lever attached. · This is done by removing the Allen bolt that holds the L shaped bracket to the base assembly. Important: Note the spacer arrangement before removing the Allen bolt. · Retain all parts for later reassembly. B. Install the cables · Screw the SHIFT cable all the way into the rod end bearing on the L shaped bracket and then unscrew 5 full turns. This will give it the correct spacing. · Now install the CROSSGATE cable into the rod end on the crossgate lever. Again screw it all the way down and then unscrew 5 full turns. This will again provide the correct spacing. If you are using the 2nd generation kit you should screw it all the way down and then unscrew 2 full turns as the angled cable bracket will make it a little closer and this is for the crossgate arm. The bellcrank will still need to be unscrewed 5 full turns to have the clearance for the sheath protector. C. Line up base assembly · Install the base assembly by sliding it into position, under the hoses. · Replace the small rectangular plastic cover (retained from instruction 7) onto the end of the crossgate lever when the base bracket is approximately in place. Do not bolt down the LETSLA yet as it is easier to line up the crossgate into the transmission linkage when loose. Recheck that the plastic rectangular end piece is on the crossgate and in the inertia weight. (You will need to feel with your fingers to make sure it is in) D) Replace the two 14mm bolts (use LocTite Blue) · Once lined up, bolt up the LETSLA to the transmission with the stock two 14mm bolts and use LocTite Blue.
When you have both of the
14mm bolts on the base just finger tight at best reach down and then
move the interia weight back and forth like you are shifting from
3rd to 4th gear. What this will do is self align the end of the
crossgate arm with the steel cylinder into the interia weight. What
I found is that some transmission are slightly different than
others, but the stock shifter with the plastic bushings has so much
play it did not matter for the stock unit, but with the LETLSA it
needs to self align to have smooth results with minimal friction.
You should be able to move the stock interia weight back and forth
and it should be very easy. Now Tigthen down the 14mm bolts and test
again to make sure the interia weight can go back and forth just as
easy. If it can not move easy check to see if the end of the
crossgate arm and steel cylinder is pushing into the interia weight
to far. If it does you will need to install another washer as in
step 14. It does sound odd, but the crossgate steel cylinder and arm
are what can cause forward and back motion to have friction if not
done correctly. E) Connecting the rod end linkage to the L bracket. · Connect the rod end linkage to the L bracket using the 12mm nut and washer removed previously (instruction 8). Remember to apply LocTite Blue. Now reconnect the L bracket with spacer in between the LETSLA base plate (again use LocTite Blue).
F) Install the LETSLA cable bracket. · Attach the new LETSLA cable bracket using the two stock 14mm bolts removed during removal instruction 2. If you are using the stock location on the bellcrank lever for the rod end bearing so you have stock throw you should use the stock cable bracket. If you have the 2nd generation kit you will need to install the alum angled spacer between the cable bracket and transmission to get the correct angle. The big end of this goes down so the bracket is angled towards the engine. For now, leave the cables free to facilitate the removal of the center console.
G)-Remove the center console cover. Important note- Option- You can also remove the center console on the 05-06 cars by removing the shift knob and then removing the clip that holds the reverse cable on. This way you do not have to take the zip tie off the leather boot and will give you some more room if you decide to take this option. This is required to set your desired gearshift travel. · Take off the two side screws on the center console cover. · Then using the Allen wrench take off the parking brake aluminum cover. · Now you can pull up the cover a little bit and removed the two (or three if you have TC) electrical connectors for the hazard lights and door locks. Tip: I found it easier to reach my hand inside and push the hazard switch up and then disconnect. Followed by disconnecting the door locks from underneath. · Pull up the center console, but when you get it up a bit you will need to cut the zip tie cable that is holding the leather gearshift boot in place. Once the zip tie is cut, remove the entire console cover. Note: You may need to remove the gearshift knob as on some cars as the leather shift boot may be too tight. 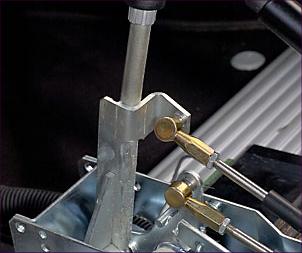
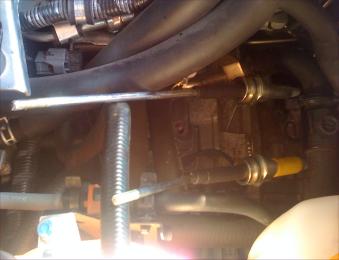
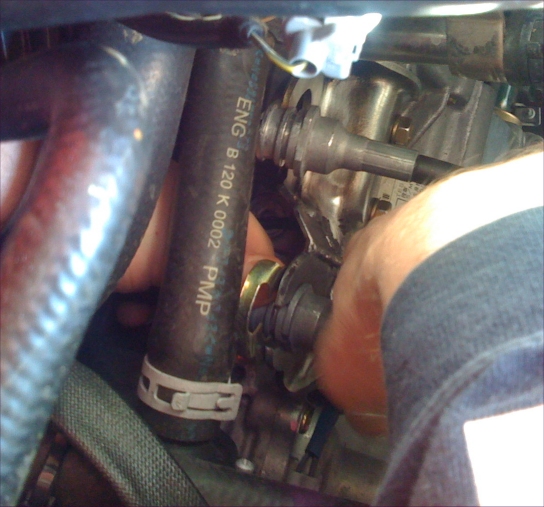
 H) Attach the Shift and Crossgate cables to the LETSLA bracket. · Place the cables into place · Attach the C-clips over the cables to retain the cables in position. Installing the cable C clips can be tricky as it has to be a tight fit to stay. Tip: What I do is reach my left arm down and hold the cable on that side with my fingers and also hold the C clip with my thumb in place above the cable. Then with my right hand I reach down and push the cable in place and push the C clip on. It is really easy and quick this way. See pictures below for details. Also make sure you tighten down the locking nut on the cable where the rod end is now that everything is installed
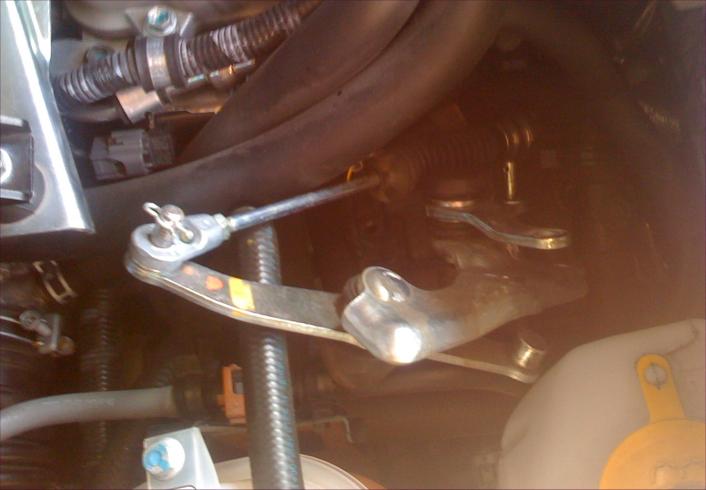
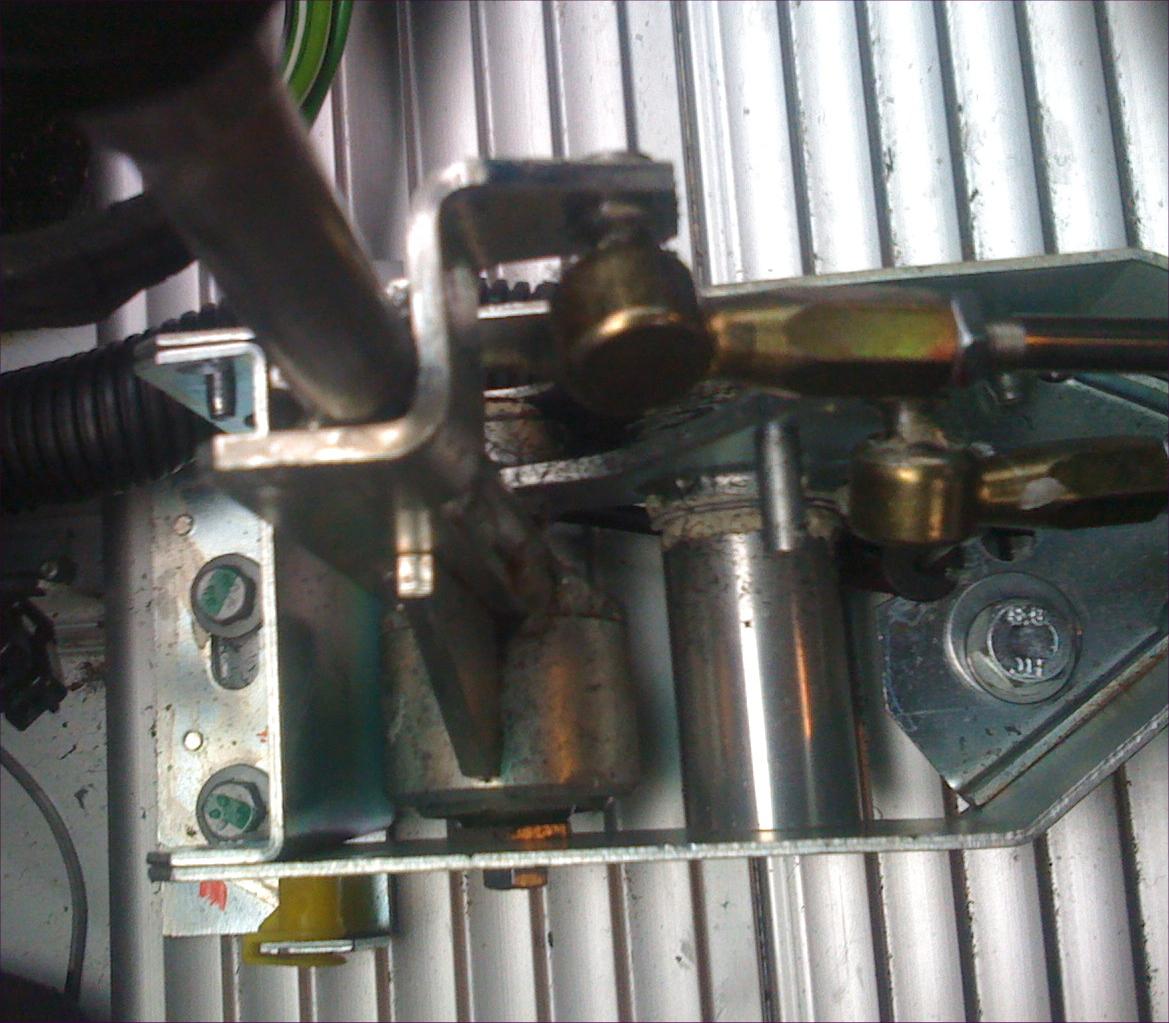
I) Adjusting the Shift and Crossgate Cables - This is a very important step and the reason for my of my tech calls. Read this twice. First, try out all the gears and if they go in fine then no adjustment is needed! The two main adjustments to check for are: 1. How easily the gear lever goes into 1st-2nd from the neutral position. 2. How easily 5th gear can be engaged. If some adjustment is desired or required (in order to have the correct actuation of the shifter), this will be achieved by adjustment of the Shift and/or Crossgate cables. Crossgate cable adjustment: The Crossgate cable controls Left to Right movement · The Crossgate cable is the LOWER cable attached to the gearshift assembly (see the picture below). · You may need to screw in the fitting onto the cable to have the correct position. · To get the fitting off all you need to do is put a 10mm or 12mm open end wrench between the fitting and the metal flat portion of the shifter and pop it off. · Once popped off unscrew the locking nut with two open end wrenches and screw in the fitting 2 to 3 turns. · Now put it back on and try the shifter again. · Repeat this process until you get the feel to how you like.
Important
note: Check that you have not over tightened the cable during the
cable adjustment. Shift cable adjustment: The Shift cable controls backwards and forwards movement. If some adjustment is desired or required in the 1st-2nd gearshift travel, this will be achieved by adjustment of the Shift cable.
·
The Shift cable is the UPPER cable attached to the gearshift
assembly (see picture below) Important Note: Do not make the shifter come too far forward and not have enough threads on the fitting.
Optional center console stabilizer install- This is not included with current kits, but may be in an older kit if you have it. The LETSLA kit comes with an optional spacer for the front console area and you can install it if you want. On some cars, the holes line up perfectly (my 05 Elise it worked fine) but on some newer cars the hole did not. For those whose do not line up use of a Dremel drill will be needed to make the hole in the correct place. The kit includes a 30mm spacer, 50mm Allen bolt, flat washer and locking washer. Installation: · Remove the two bolts from the front of the gearshift housing using a 10 mm socket. Retain bolts for reassembly. · Pull up the center column an inch or two so that you can slip in the spacer (see drawing below) · Line up spacer then attach the Allen bolt using the supplied locking and flat washer. Tighten the Allen bolt only a few turns with an Allen wrench. Reinstall the two 10mm bolts loosely on the front of the gearshift housing. Now tighten all 3 bolts completely.
Reattach center console cover. Installation of the center console cover is the reverse of the removal. (A new zip tie is included with LETSLA). Tip: To make reattachment of the console easier, remove the (C) clips that hold the cables on the transmission side to the new cable bracket. This will provide a lot more play. The minute it takes to take off the clips and put them back on is well worth the effort up front when installing the console. Did you tighten all bolts and are they all set with LocTite Blue?
Driving the car. It will only take a minute to get used the fast shifting and great feeling shifter. Drive safe and have fun with your now fast shifting car. Additional adjustment: Adjusting the ratios to suit your desired shift.
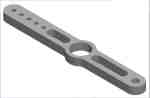
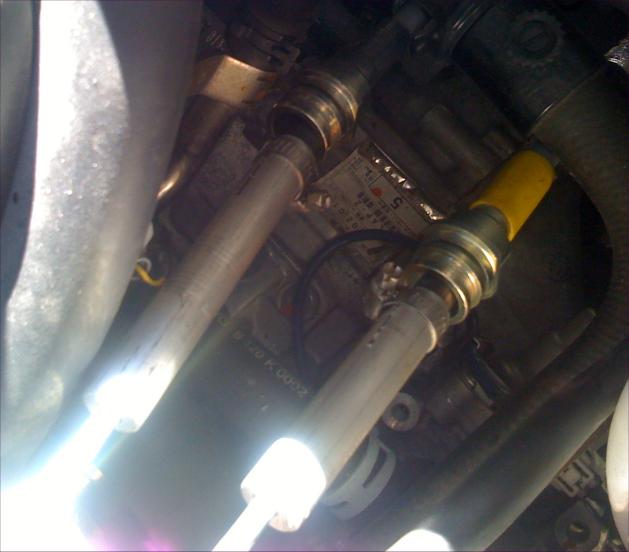
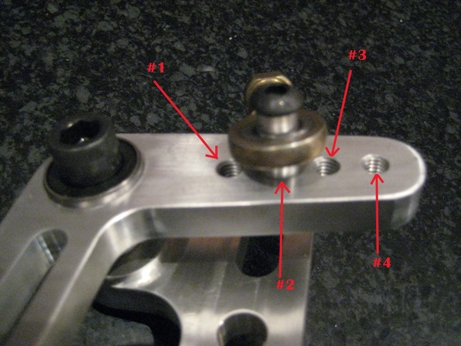
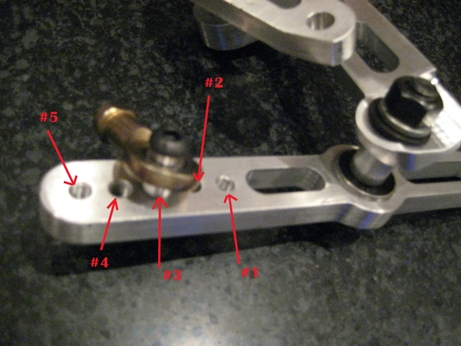
The LETSLA comes preassembled with the 2nd to shortest throw setting. You have the choice of adjusting the ratios on the levers from a little more than stock to far shorter. (i) To replicate Stock shifting. For the stock throw you would use the following settings. a) Shift cable: Use hole #4 (see picture below) on the L shaped bellcrank lever b) Crossgate cable: Use hole # 5( see picture below) on the Crossgate lever Important: Do not use the shortest throw on the Crossgate lever, hole #1 as the rod end bearing will hit the L shaped bracket and bind. (ii) To select other shorter or longer shifting distances. Shorter shifts: · Move the Allen bolt holding the Shift cable connector to the L shaped Bellcrank lever, to a hole with a LOWER number (see picture below). Always use Blue LocTite. Longer shifts: · Move the Allen bolt holding the Shift cable connector to the L shaped Bellcrank lever, to a hole with a HIGHER number (see picture below). Always use Blue LocTite. Tool Tip: A long T-handle Allen wrench works best. Did you tighten all bolts and are they all set with LocTite Blue?
FAQ's
1- My car will
not go into 1st-2nd gear? My car will go into reverse when I try to
go into 1st-2nd?
|
|
|
|
|