
|
|
LETSLA 2nd Generation upgrade kit instructions |
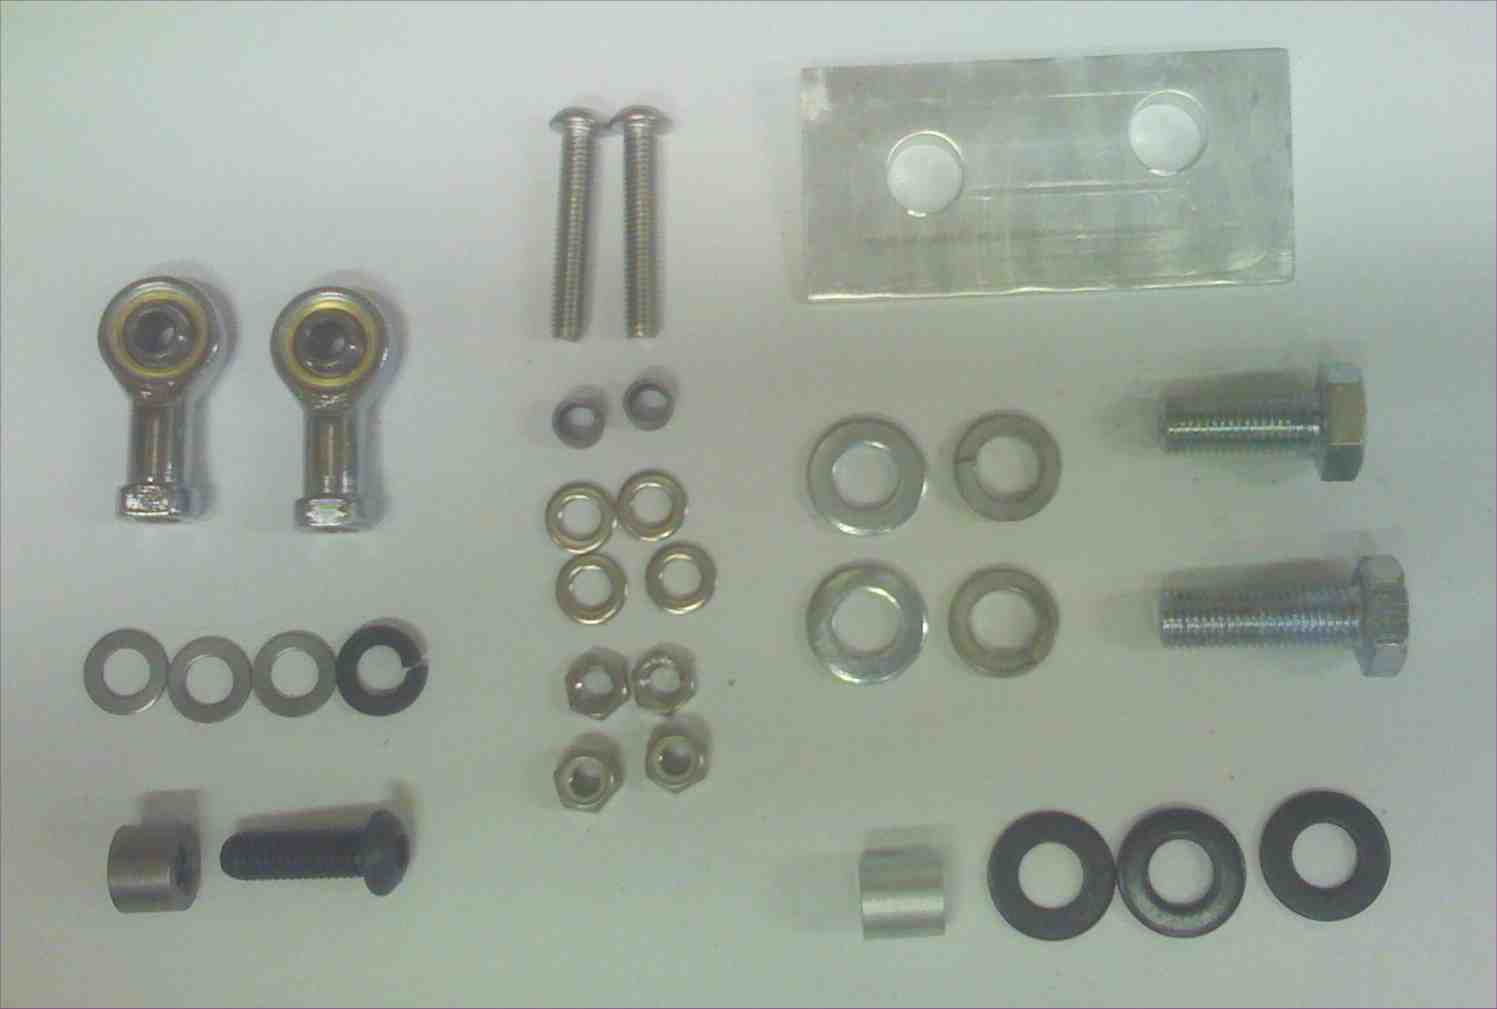
LETSLA 2nd generation upgrade kit.
The 2nd gen kit includes- 2 new more robust chrome plated rod end
bearings, 2 stainless steel 6mm allen bolts for the rod ends, 2 6mm
steel spacers, 2 regular 6mm hex nuts, 4 6mm washers, 2 6mm nylon
washer, 1 8mm allen bolt, 3 8mm stainless steel washers, 1 14mm x 11mm
crossgate interia spacer, 1 3/8" x .500" spacer, 3 3/8" washers, 2
14mmx1.25x30mm bolts, 2 14mm washers, 2 14mm lock washers, and the alum
angled spacer for the cable bracket so the cables are at the correct
angle to the LETSLA when installed.
1- Remove the LETSLA from the car if it is installed. You will also need to remove the cable bracket so you can install the angled piece later, plus it makes getting the LETSLA out easier. See install instructions if you need details on how it was installed. Click here for install instructions.
2- Now that is it out remove the two brass colored rod ends with an allen wrench. Make note on to what side they are and their location as you will want to install the new ones in the same location.
3- You will need to assemble the rod end with the hardware partially
before installing the rod end onto the LETSLA. Below is a picture of the
order you need to assemble it.

4- First put the 6mm allen bolt through the rod end, then the steel
spacer and the single hex nut (the one without the nylon insert). You
will want to tighten down the allen bolt, steel spacer and nut onto the
rod end. Make sure it is snug and tight, but do not strip the allen
bolt.

5- You will want to use some blue loctite on the threads when installing
it on the LETSLA just to make sure it does not move later.

6- Make sure you put the washer on the rod end allen bolt before
installing it onto the LETSLA. Now screw the rod end onto the LETSLA and
make it tight.

7- You will then install the washer and then nylon locking nut. Since it
has nylon you do not need loctite on this nut.

8- Now do the same to the other rod end on the LETSLA for either the bellcrank or crossgate.
9- You can now install the new steel crossgate interia cylinder. (I did
not know what else to call it). You will need to take off the stock alum
one and make sure you note which way it goes as you can get confused and
put it on upside down and it will not work at all.

10- You will put the 8mm allen bolt, with the locking washer on first
and then the flat washer. You want the locking washer to be in the
middle of the allen head and the flat washer to keep it from biting into
the alum on the LETSLA crossgate arm.

11- Now slide the allen bolt with two washers onto the end of crossgate
arm and then two 8mm washers. This will give it the correct spacing
needed.

12- Install the the new steel crossgate interia cylinder onto the end of
the allen bolt, but first you should use some red loctite to make sure
it does not move later. If you do not have red you can use blue, but I
recommend red. It does have a locking washer and that with the red
loctite will make it so it will not move when installed.


13- When you installed the new steel cylinder and spacers you actually
moved the location of the end of steel crossgate spacer so we need to
now adjust that. Included in the kit are 3 3/8" washers, but you should
only need two for the crossgate location. First take apart the crossgate
with and allen wrench and wrench or socket. Make note on the way the
washers are and how it comes apart.


14- Now that you have it apart you will need to install 2 of the 3/8"
washers on top of the alum spacer. This will give it the correct
spacing.

15- You will now slide the 3/8 allen bolt back onto the LETSLA base. You
will put on the flat washer, then locking washer with nut. Put some blue
loctite on the nut to just make sure it will not move later.

16- You will move on to the bellcrank lever. Remove the bellcrank lever
and note on the way it is installed now.

17- You will need to remove the alum spacer that is raising the
bellcrank lever above the LETSLA base. The new spacer is longer and will
move the bellcrank lever higher. You may need to hold the old spacer
with a vise grip and unscrew the allen spacer.

18- You will now install the new longer alum spacer and put the
bellcrank arm back onto the base. Make sure you use blue loctite on the
threads when installing.
19- Make sure the bellcrank arm with the new rod end installed will
clear the bolt that holds the base to the transmission. You can just
take the stock 14mm bolt and hold it in place and move the bellcrank
back and forth to make sure the nylon nut does not hit the 14mm stock
bolt when installed. If it does hit, use the extra 3/8" washer included
and move the bellcrank arm up a little bit to be out of the way.

20- Now
the not so fun part and this part is important so you can not skip this
step. You will need to drill out the base of the LETSLA with a 1/2" drill bit.
What this does is give the LETSLA base a little play in it so it will self align
when installing it later and will make the forward to back motion have less
friction and binding when installed. Even if you think it does not need it you
should and need to do it. You can put it in a vice and if you have a drill press
even better. The size difference is not much so it should not be hard to drill
out.

Important process
here- Make sure you do this when installing!
21- You will now need to install the LETSLA again. The process is the same as
before with one change. Since you drilled out the base when you install the base
do not tighten it down all the way at first, just slightly finger tight (Use
blue loctite). When you have both of the 14mm bolts on the base just finger
tight at best reach down and then move the interia weight back and forth like
you are shifting from 3rd to 4th gear. What this will do is self align the end
of the crossgate arm with the steel cylinder into the interia weight. What I
found is that some transmission are slightly different than others, but the
stock shifter with the plastic bushings has so much play it did not matter for
the stock unit, but with the LETLSA it needs to self align to have smooth
results with minimal friction. You should be able to move the stock interia
weight back and forth and it should be very easy. Now Tigthen down the 14mm
bolts and test again to make sure the interia weight can go back and forth just
as easy. If it can not move easy check to see if the end of the crossgate arm
and steel cylinder is pushing into the interia weight to far. If it does you
will need to install another washer as in step 14. It does sound odd, but the
crossgate steel cylinder and arm are what can cause forward and back motion to
have friction if not done correctly.
22- Install the rest of the LETSLA the same as before per the installation instructions. There are only two new changes. The first is when you install the crossgate arm you will need to adjust the left to right on the front again. You may be able to avoid this when you install the rod end onto the crossgate cable it used to say screw down all the way and then out 5 turns. Instead do it only 2 turns. The bellcrank still needs 5 turns to clear the sheath protector. After installed you may need to pull up the center console and adjust the crossgate rod end on that side to make sure you get into 1st-2nd gear just right and do not go to far to get into reverse. You may need to screw that rod end in a turn or two. Try it out and it should go into 1st-2nd from nuteral with ease so it is not to far and not to little. See the install instructions for more on this.
23- Almost done. You will need to install the cable bracket with the new angled spacer. The angled spacer will only go one way as the bolts are offset a little bit. When you install the spacer it will go on so it is touching the transmission and then the cable bracket with the new 10mm x 30mm long bolts. Use the bolts with flat washer and locking washer. You will want the bolt to have the locking washer go on first and then the flat washer so the flat washer is what is actually touching the cable bracket. Make sure you use blue loctite on it when in installing it.